Two Is One, One Is None
Your computer is priceless. It doesn’t matter whether or not you have a new top-of-the-line desktop or an ancient, eight-year-old clunker, these computers are priceless not because of their specs but because of the data entrusted to their care. Nowadays, we trust our computers not only with memories such as baby pictures and wedding videos but also files critical to our livelihoods like personal projects and art portfolios. This data is more than just computer files, it’s an extension of ourselves: our memories, our livelihoods, our lives. This data, your data, is precious.
Yet I generally do not see this importance manifesting in protective action. From observing individuals breaking down at the Apple Store when they discover their family photos are lost forever to witnessing an artist and personal friend lose their entire life’s works, I’ve sadly also seen the consequences of neglecting such action. Depending on your response to the following question, it’s not a matter of if you’ll share a similar fate, but when: Do you back up your devices?
I’ve learned the value of doing so not just from observation but also from firsthand experience. Back when Apple released the then-new Apple Music service I quickly signed up without a second thought and turned on the option to integrate my local iTunes library with my new iCloud Music Library. Big mistake.
Unbeknownst to me, choosing to merge the two took my carefully curated music library and began wreaking havoc. Instead of respecting the existing metadata, my hand-picked, high-resolution album art was replaced with shoddy, low resolution iTunes versions (oftentimes incorrect ones) and plenty of live performances and bootlegs such as The Beach Boys’ SMiLE were replaced completely or misattributed. While this horrifying Apple Music flaw has seemingly now been addressed, had I neglected maintaining regular backups I would have had to either go by hand and reconstruct the entire 200+ album library to the best of my ability or resign myself to living with a new, incorrectly matched, incomplete, and malformed library. Having a backup made what would have been a disaster into a slight inconvenience (Some, like Jim Dalrymple, were unfortunate enough to end up on the other side of this example).
Accidents aren’t limited to external forces like natural disasters, hard drive failures, or disastrous software releases like Apple Music. Back at school a couple years ago I was feverishly clacking away the final touches of a relatively large programming assignment which was due at the start of class next hour. I was maintaining a decent pace, but my workspace was a mess and it was beginning to hinder my ability to develop quickly. “Whatever”, I thought, “deleting a few temporary or old files shouldn’t take long at all, no big deal”. Delete, delete, del—oh shit1.
While cleaning up I had accidentally deleted the directory containing the project itself, along with the entirety of my work which had taken me the better part of a weekend to complete. And it was due in an hour. Thankfully, I could evade this potentially disastrous situation because of my realtime cloud backups with Backblaze. All I had to do to get my project back was log onto their website and download a zip of the project’s backup from five minutes ago. I was able to get my assignment done on time with the ‘A’ I had worked so hard for.
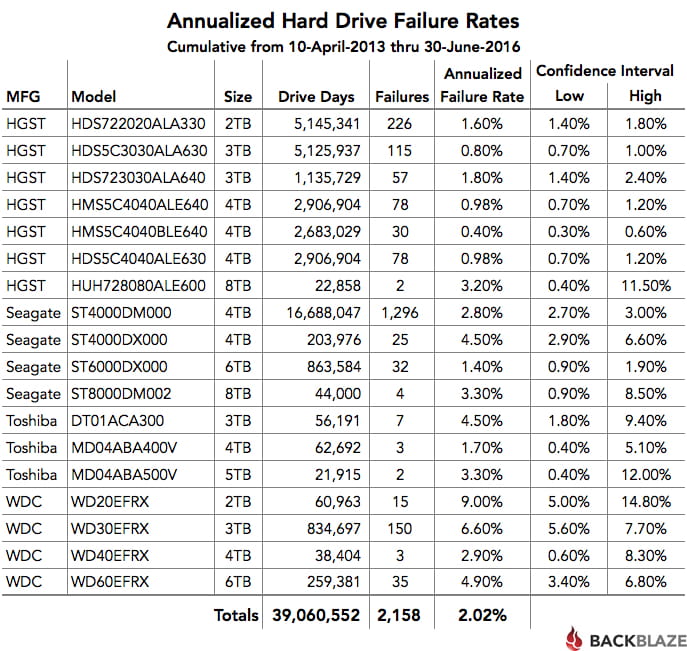
For those rightfully skeptical about taking my anecdotes to heart, the aforementioned backup service Backblaze publishes quarterly hard drive reports covering the various brands and drive sizes they use in their servers and the failure rates they encountered for each of them. Below is the most recent cumulative report available, which goes back all the way to when they started releasing them in 2013.
Backblaze’s findings over the years are concerning. Overall, a little over 2% of all drives used in Backblaze’s servers fail every year. Being professionals, Backblaze has sufficient data redundancy to safely handle this percentage, but for the population at large 2% of all computers experiencing hard drive failures at any given year is a staggering number, around two million computers assuming only half of Backblaze’s observations are representative of the larger population and assuming around two billion PCs in the world).
Trust me, I know from first and second hand experience; hard drive failures, accidents from external forces, or even personal mistakes can and will happen. The time to take action to protect yourself against these forces is now.
The Incredible, Fallible Computer
If you are not currently backing up your computer, please realize this is a perfectly natural position to be in. It’s become deceptively easy nowadays to forget (or never learn) how fragile our data really is. It’s comfortable to view our computers as little, magic “black boxes” that will persist as long as we need them to. While perceiving our computing devices through this lens certainly has its benefits, promoting healthy levels of protection is not one of them. Our computers are fallible, not only to our own mistakes and external factors such as theft and water damage but also to inherit, non-negligible hard drive failure rates.
For a while now, computer companies have taken steps to integrate healthy backup habits into their operating systems with varying degrees of success. While some like Apple overall do a decent job implementing human-focused solutions like Time Machine on macOS and automatic iCloud backups on iOS, others like Microsoft make backing up a user-hostile, complicated process. Windows requires a base level of computer literacy in order to keep up with the constant changes Microsoft has made to their backup process over the past four years. How on earth are everyday people supposed to understand the difference between backups, restore points, and system images, keep up with Microsoft’s indecision as to how these choices should be presented, and have the knowledge to make an educated decision on which one to choose? Most people see confusing and complicated disasters like Microsoft’s backup system, decide it’s simply not worth the hassle and possible risk of “screwing something up”, and end up skipping backups entirely.
Apple has plenty of issues of their own to overcome, specifically with respect to iCloud backups. While the automatic iCloud backups mentioned before are nice in theory their current implementation as of iOS 10 isn’t a “true” backup and omits things like music and video. Not to mention the default iCloud storage quota is 5 GB regardless of how many Apple devices you have, so oftentimes there’s not enough storage for all your iOS devices to backup successfully without paying for an upgraded plan. As you would imagine, most people just stick with the 5 GB quota at the expense of either their iPhone or iPad (or in worst case scenarios, both) being omitted from the nightly backups due to the stingy iCloud storage quota. Also, macOS mysteriously missing the ability to make automatic iCloud backups at night as well despite iCloud now offering large enough storage tiers to support this is deceptively inconsistent and disappointing.
Since most companies are continuing to drop the ball either from incompetence (Microsoft) or penny-pinching (Apple), it’s important for you to understand this is something you need to address and take into your own hands until they get their acts together. The question is, how?
The One, Two Punch
What I personally believe to be the optimal backup strategy for the vast majority of people is the classic one, two punch: at least one local backup and at least one remote backup in addition to the original copy on your originating device.
Local Backups
As mentioned before, Time Machine can be used for local backups on macOS. Assuming you don’t already have a spare external hard drive lying around, I recommend buying one that is at least double what your computer’s internal storage is. You can determine what this is by clicking the Apple menu on your computer’s menu bar then “About this Mac”. From there, click the “Storage” tab and note the total storage size.
For example, if I’m setting myself up for Time Machine backups for the first time I’d search “external hard drive” at Amazon or NewEgg and seek out drives that have double or more the number noted above. For reference, you’re looking for something like these. Please note that you may run across smaller numbers followed by “TB” instead of “GB”. You can think of “TB” as the “kilometer” to GB’s “meter”, with 1 TB roughly equaling 1000 GB2. In your search, it’s okay to be a little above or a little below the doubled size you noted before, what you’re effectively doing is giving yourself some elbow room for your data to grow and for Time Machine to maintain a respectable archive of old, deleted/changed files. When the time comes, plug the new drive into your Mac and a little notification should pop up asking if you want macOS to use it for Time Machine backups, say “yes” and macOS will take care of the rest. Leave this external hard drive plugged in as often as you can so macOS can conduct automatic, scheduled backups to it.
While Windows doesn’t currently have a solution as mature as Time Machine, Microsoft provides a help article detailing all the different kinds of backups Windows provides, separated by versions and backup types. If that’s too much hassle you could always bring your computer into an Apple store, buy a new iMac, have them transfer your files for free, and then backup using Time Machine as described above. Your old Windows PC can find new life as a decent doorstop.
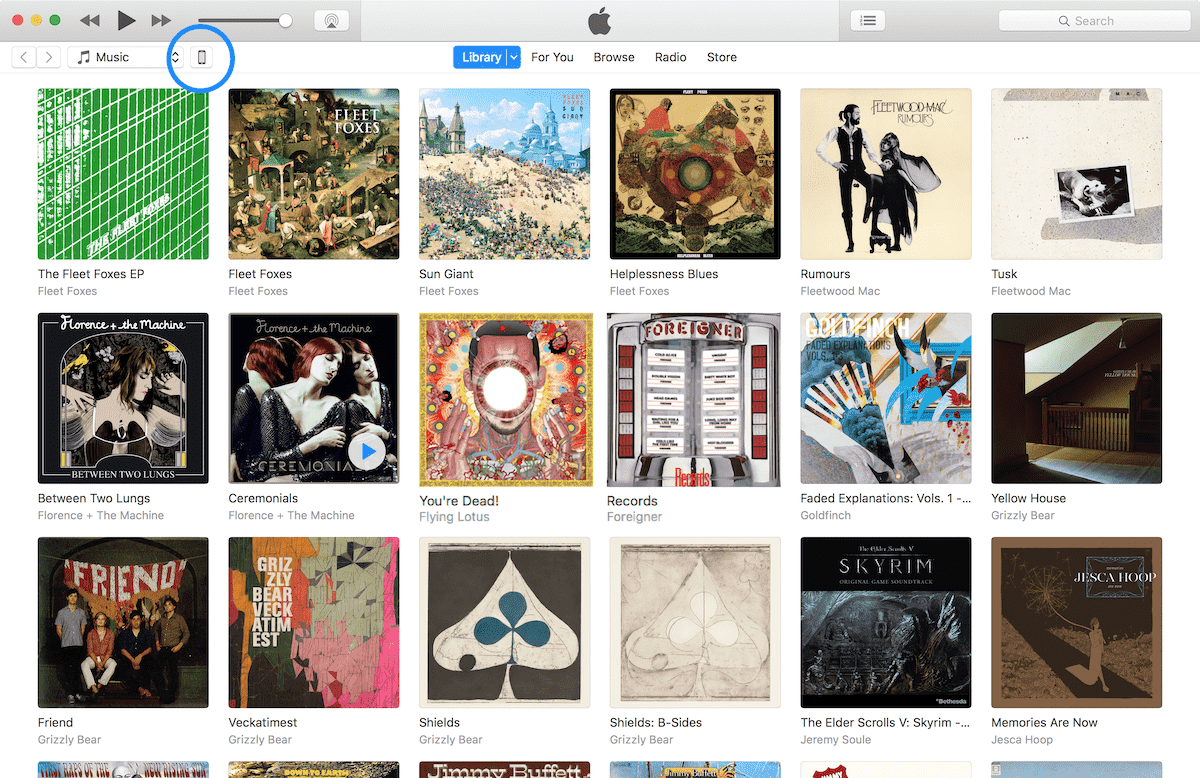
For locally backing up your iPhone or iPad, plug it into your computer and open up iTunes. Assuming you’ve synced with this computer before, your device should appear near the library switcher in the upper-left corner of the window.
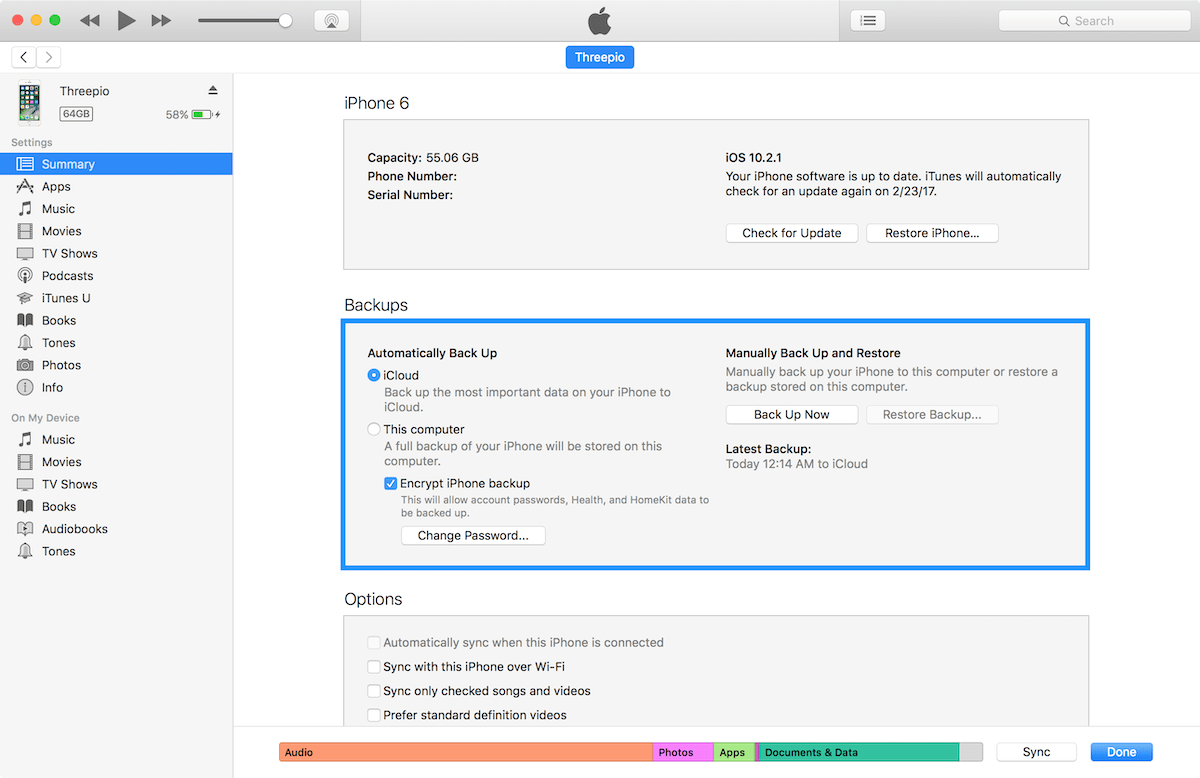
Once you click on your device you’ll be brought to a screen like this.
You’re going to want to temporarily switch the bubble from “iCloud” to “This computer”, then check “Encrypt iPhone backup” which will prompt you for a password. Setting an encryption password serves both security and convenience purposes: first, it protects your backup’s text messages, photos, etc. from potential snoops and lets you restore from a backup without having to reenter all your iOS passwords all over again like the iCloud backup does. After you’ve entered your password, you can click “Back Up Now”. Once this backup completes, switch “This computer” back to “iCloud” and click “Done”. Now you can safely eject your iPhone or iPad and go about your day knowing that you have a recent, local backup of your portable’s data should anything happen.
Remote Backups
That covers local backups, but what about those remote backups mentioned before? Backing up remotely has never been easier thanks to Backblaze. Simply navigate to their website and sign up for their personal unlimited backup plan, Backblaze will guide you through the necessary steps to start. Backblaze’s small backup utility will continuously run in the background of your computer and automatically send any new/modified files to their secure servers. You don’t have to do a thing. Should you wish to check on your backup’s status or fiddle with the settings you can navigate to their preferences pane in System Preferences > Backblaze Backup.
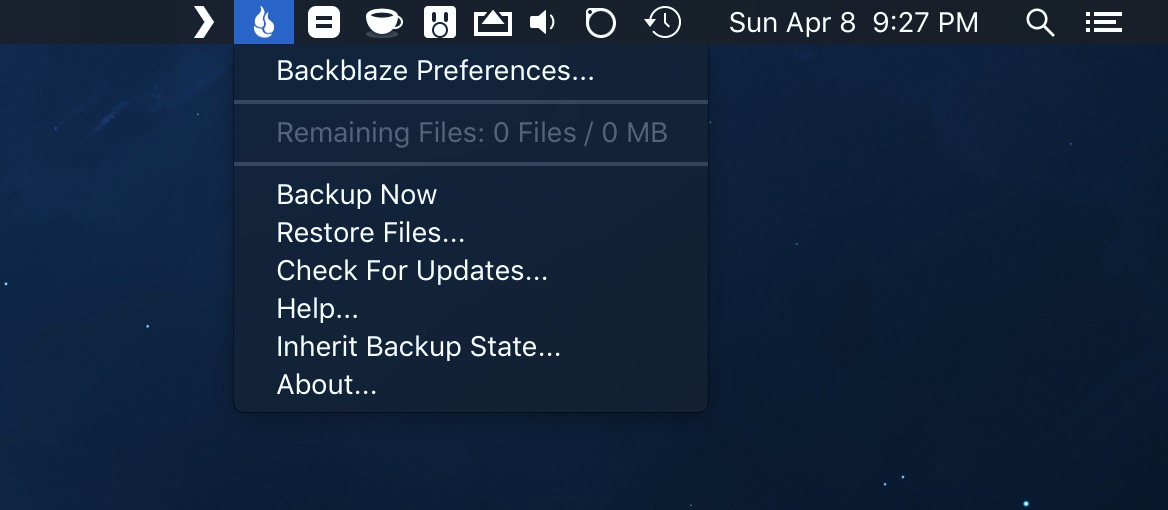
Alternatively, for just occasionally checking in on the backups you can check out the little flame icon in your menu bar.
I personally recommend choosing the 2-year $95 plan over the monthly $5 or yearly $50 plans, you’ll save more money in the long run while also avoiding yet another monthly fee. Even Windows users can sign up for remote backups with Backblaze, so there’s no reason not to sign up. I’ve been backing up my data with them for six years now and they’ve not only helped me restore numerous prematurely deleted files but also granted me peace of mind, knowing that my livelihood and family memories are safe against all potential local threats.
For your iOS devices like iPhone and iPad, remote backups are built-in. Every night while you’re asleep and your devices are charging they will automatically back themselves up to iCloud for you. The caveat to this is if you ever run out of free space in your iCloud storage the backups will start failing until you either free up some space or upgrade your storage plan. To prevent this from ever happening, I highly recommend upgrading your plan to the next available storage tier, 50 GB for $0.99 a month. This should be plenty for your iPhone and iPad to both backup to the cloud at night. Apple maintains a complete and up-to-date guide for how to upgrade your iCloud storage plan here.
That’s it! I have no doubt many people will be turned off from backing up because of the modest monetary investment required to do so, and that’s understandable. It helps to think of backups as if it were insurance; it’s a required investment to protect yourself against whatever life throws our way. The cost is an investment in protecting your past, present, and future digital lifestyle, and for the peace of mind that brings it’s a small price to pay. Just remember: the time to think about backups is now, not when the rainy day comes.
⌘
-
Ah, the joys of Terminal. Usually, when you delete things on your computer they go into a Trash bin instead of being immediately deleted in order to help people recover from this exact situation. The Terminal is different; if you
rmsomething (the Unix command to “remove”/delete a file), it’s gone. Nearly every developer has fallen prey to this at some point, even Pixar once accidentally deleted the entire Toy Store 2 film with a variant of this command (rm -rf *). ↩︎ -
For those curious, the exact measurement is 1 TB = 1024 GB when expressing the capacity in it’s true form, binary, while 1 TB = 1000 GB when expressing it in the “human readable” decimal form. Most manufacturers use the decimal form, so you can just apply standard metric conversions. See more on storage sizes here. ↩︎


